Tilesmith guide
Split images or prepare sprite sheets
Cut a photo or image into PNG pieces, or prepare sprites for your game with animation, autotiling, pivots and collision. Choose a starting path, then use the same editor for either job. Everything runs in your browser, so nothing is uploaded and there's nothing to install.
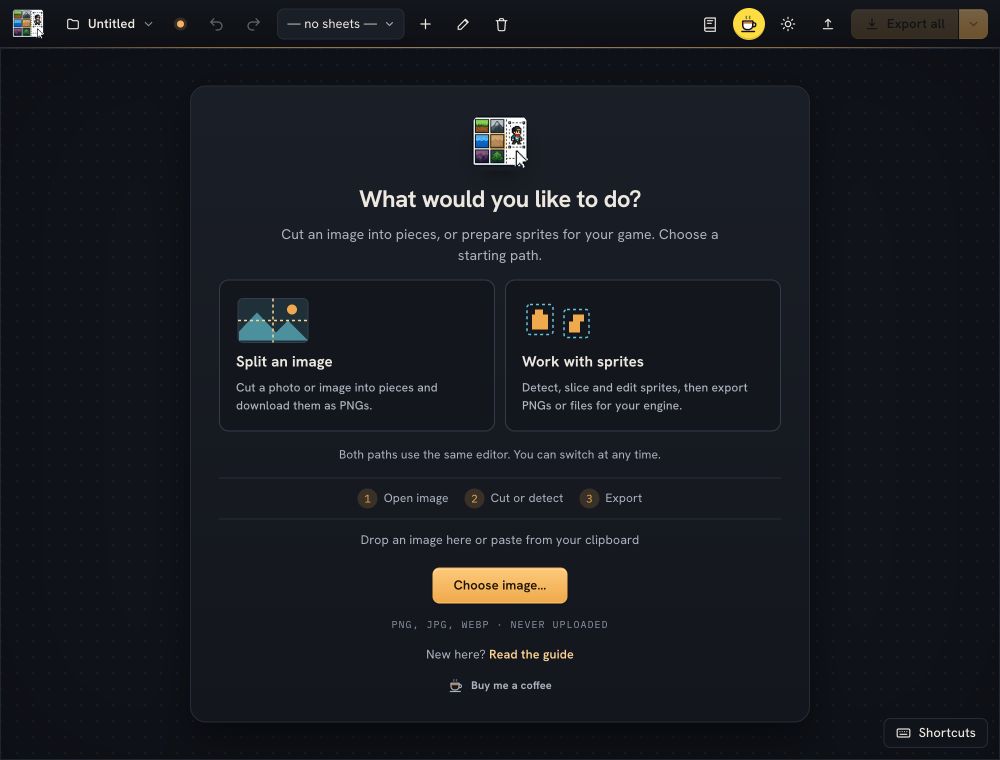
On the start screen, choose Split an image or Work with sprites, then open your image. Dropping or pasting an image without choosing starts image cutting. Switch at any time with Workflow above the canvas: your image, cuts and metadata stay intact. Saved projects reopen in their chosen workflow.
Start here
Split an image into pieces
Use this path for a photo, illustration or any image you want to cut into smaller PNGs.
- Choose Split an image and load it. Drop it anywhere on the page, paste it with ⌘/Ctrl V, or press Choose image… on the start screen. PNG, JPG, WebP and any other image your browser can open all work.
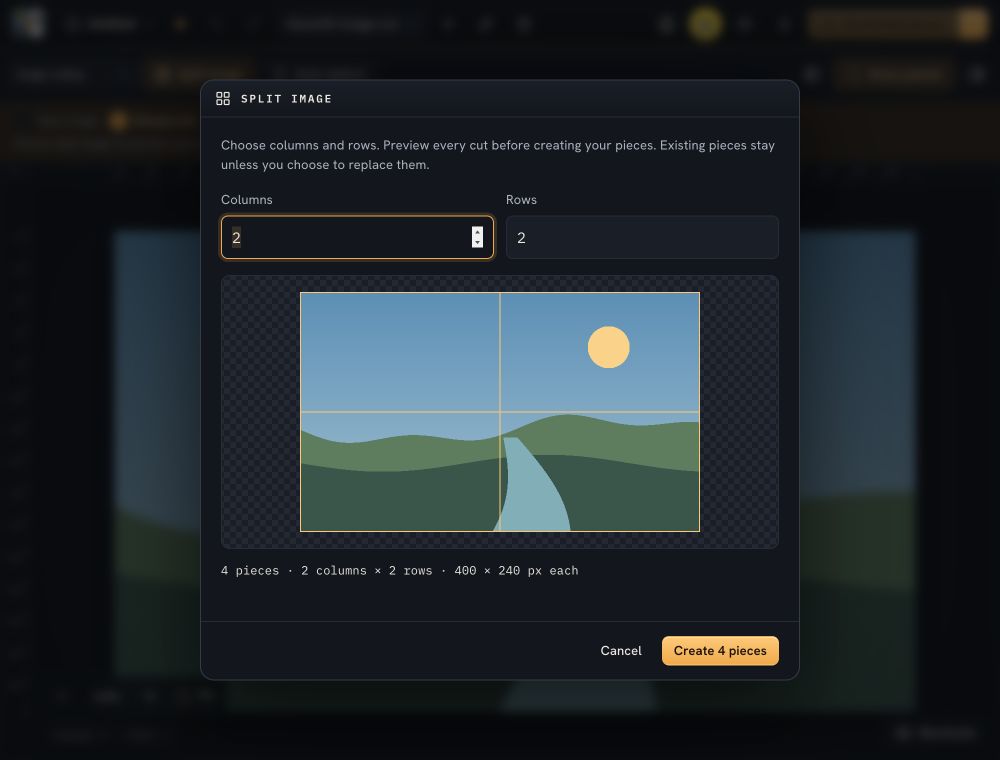
- Preview the cuts. Press Split image above the canvas. Start with 2 columns and 2 rows, or change the counts. The preview shows every cut and the resulting piece sizes. For custom cuts, cancel and draw rectangles on the image instead.
- Create the pieces. Press Create N pieces. Every pixel is included, even when the image dimensions do not divide evenly. Existing pieces stay unless you check Replace the existing pieces. ⌘/Ctrl Z undoes the whole split, including a replacement.
- Download. Press Download pieces in the top toolbar. You get
<image>.pieces.zip, with one full-size PNG per piece. Transparent edges stay in place. JPG and WebP inputs also produce PNG pieces.
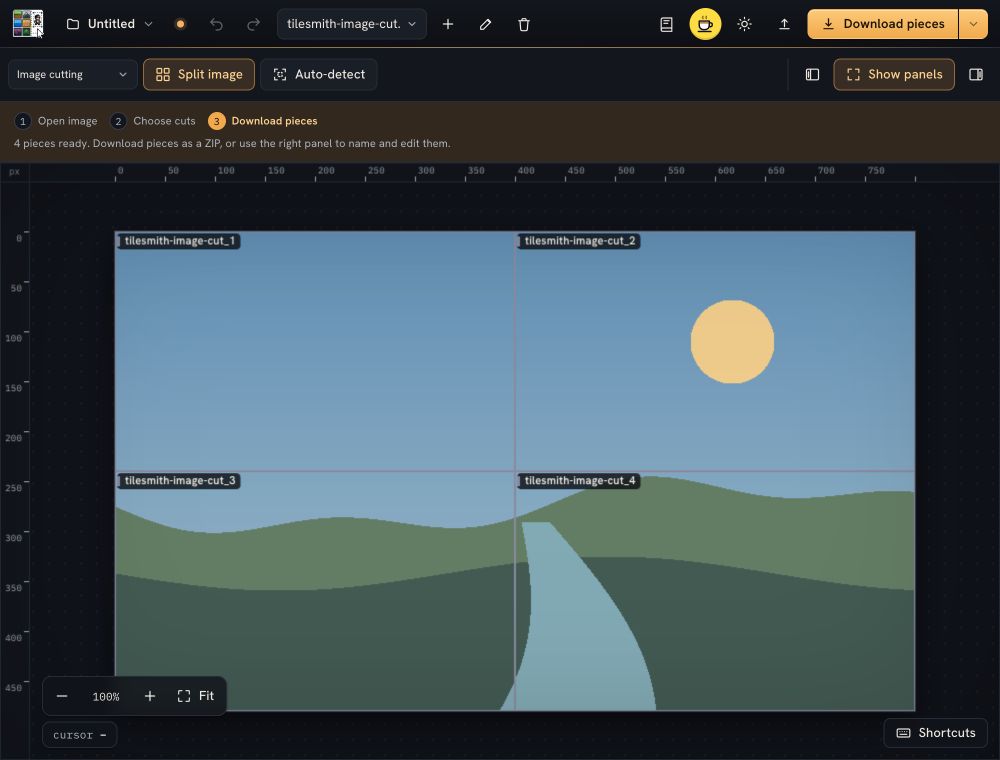
Open the right panel to name, resize or edit pieces. Names become the PNG file names. Select one piece and press PNG to download it on its own. Need automatic sprite detection or engine files? Switch Workflow to Sprite editing.
Start here
Map a tileset for your engine
A prop is a named rectangle on your sheet: a tile, a tree, a building, a character's walk cycle. Map the props once and every export carries them.
- Choose Work with sprites and load your sheet. Then set the tile size under Grid & snapping. If the image is already open, choose Sprite editing from Workflow above the canvas.
- Mark the props. Drag a rectangle over each object on the sheet, or let Auto-detect find them. With Snap to grid on, rectangles land on whole tiles.
- Name them. Give each prop a name and a category. Categories colour-code props on the sheet, so a mapped sheet reads at a glance.
- Add what the game needs. Animation for multi-frame props, Autotile / terrain for tiles that connect, Game data for pivots and collision, Custom metadata for anything else.
- Export. Pick your engine from the Export menu. After that, the Export button, or ⌘/Ctrl E, repeats it in one go.
- Keep it safe. Save the project to a folder next to your game, so it's on your disk and in version control. See Where your work is saved.
Start here
The workspace
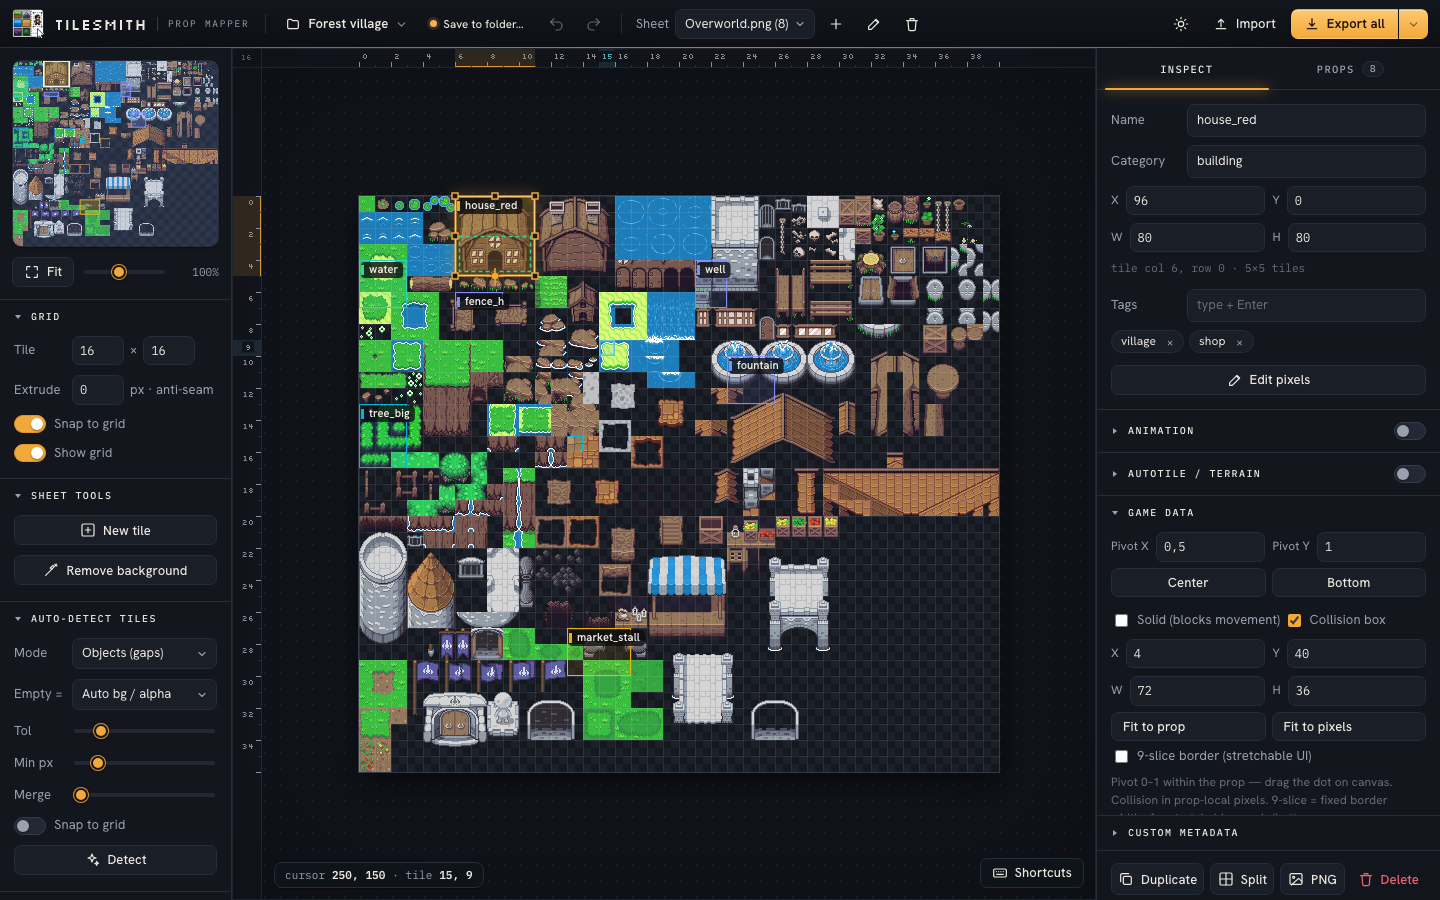
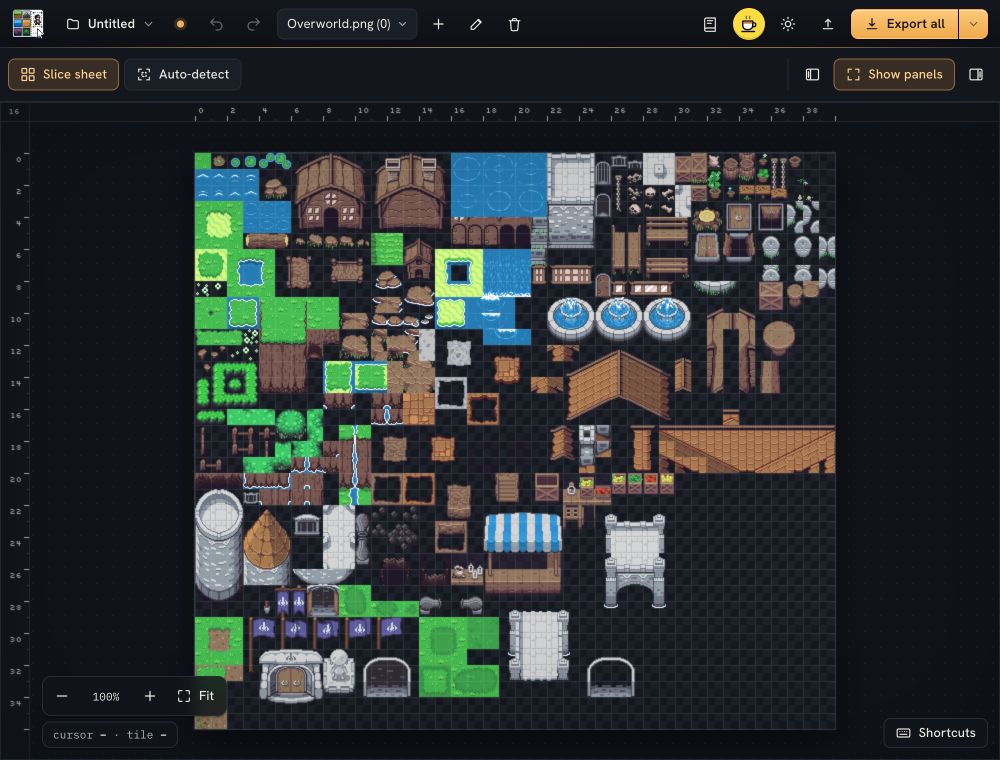
This tour shows the sprite-editing workspace. Image cutting uses the same canvas with pixel rulers, a Pieces tab and both side panels hidden initially. Point at a number to see what each part does.
 1
2
3
4
5
6
7
8
9
1
2
3
4
5
6
7
8
9
- 1Project menuNew, open, rename and save projects. The chip beside it shows where your work is saved.
- 2SheetsOne project holds many sheets. Switch here, or add (+), rename or remove one.
- 3Import and ExportBring in props from other tools; send them to your engine.
- 4Minimap and zoomClick or drag the minimap to move around. Fit shows the whole sheet.
- 5NavigatorGrid, Sheet tools and Palette. Sections fold away and remember how you left them. Slice sheet and Auto-detect sit above the canvas.
- 6Tile rulersThe column and row under your cursor light up teal; the selected prop's span shows in amber.
- 7The sheetDraw, select, move and resize props here.
- 8Inspector and Props listEdit the selected prop, or switch to Props to see and filter them all.
- 9Cursor readoutThe pixel and tile under your cursor. Shortcuts, at the other corner, lists the keys.
Amber always marks what you're working on: the selected prop and the main action. Teal always marks a guide: the tile under your cursor, and pieces Auto-detect has found but you haven't added yet.
The sun and moon button in the toolbar switches between dark and light. Tilesmith needs a window at least 880 pixels wide; below that it asks for more room rather than squeezing the canvas away.
More room for the sheet
Press Hide panels above the canvas, or H, to enter Focus mode. Show panels, H or Esc brings both panels back. The panel icons on either side of that button hide or show the Navigator and Inspector individually. Zoom and Fit remain on the canvas.
Auto-detect opens the review panel even in Focus mode and keeps Add and Cancel visible. Cancel returns to your chosen layout; Add opens the Props list so you can edit the new sprites. Sprite editing starts with both panels visible. Image cutting starts with both hidden; use the panel icons whenever you need them.
Sheets
Loading images
- Drop one or more image files anywhere on the page. Each becomes a sheet in the open project.
- Choose a file with Choose image… on the start screen, or the + beside the sheet picker.
- Paste an image with ⌘/Ctrl V. With no sheet open, it becomes the sheet.
Any format your browser can open works: PNG, JPG, WebP and more. Tilesmith works on the pixels themselves and writes sheets back out as PNG, so transparency is kept.
Pasting onto a sheet
Paste an image while a sheet is open and it floats over the sheet, ready to place. Drag it into position, or drag its handles to resize it. The bar above the sheet has:
- W and H: the exact size in pixels.
- lock: keep the proportions while resizing.
- pixel: scale with hard edges, so pixel art stays crisp.
- grow sheet: make the sheet bigger if the paste reaches past its edge.
Press Place or Enter to bake it into the sheet, Cancel or Esc to drop it. Placing can be undone.
Sheets
Moving around
| To | Do this |
|---|---|
| Zoom | Scroll the mouse wheel; the view zooms around the cursor. The slider under the minimap works too. |
| Pan | Drag with the middle mouse button, or hold Space and drag. Clicking or dragging on the minimap jumps there. |
| See the whole sheet | Fit, or F. |
| Jump to a prop | Click it in the Props list; the view glides to it. |
| Show or hide the grid | G, or Show grid. |
At 100%, one pixel of the sheet is one pixel on screen. Above 100%, zoom moves in whole steps (200%, 300%…) so every sheet pixel stays a crisp square.
In sprite editing, the rulers along the top and left count tiles. The column and row under your cursor light up in teal, and the selected prop's span is marked in amber, so you can read a prop's tile position without counting. The corner where the rulers meet shows the tile size. The readout at the bottom left gives the exact pixel and tile under the cursor. In image cutting, the rulers count pixels and the corner reads px.
Sheets
Grid and tile size
| Setting | What it does |
|---|---|
| Tile | Width × height of one tile in pixels. Snapping, the rulers, Grid-cells detection and the tile-grid exports all use it. Each sheet keeps its own. |
| Extrude | Pads each tile with copies of its own edge pixels on export, to stop seams in tilemaps (see below). 0 is off. |
| Snap to grid | New, moved and resized props land on whole tiles. Turn it off for free-form sprites of any size. |
| Show grid | Draws the tile grid over the sheet. G toggles it. |
Extrude, and seams in tilemaps
If thin lines flicker between tiles when your game camera zooms or moves, the GPU is sampling a pixel or two outside a tile and picking up its neighbour. Set Extrude to 1 or 2. Each tile then carries a border of its own edge colour, so there's nothing foreign to pick up.
Extrusion applies to the Sheet PNG, Tiled and Godot 4 exports, which set the matching margin and spacing for you. The sheet in Tilesmith itself never changes.
Sheets
Cleaning up a sheet
Remove background
Remove background (under Sheet tools) clears a solid background, working inward from the sheet's edges like a magic wand. You see the result live before anything changes:
- Tolerance: how different a colour can be and still count as background.
- anti-fringe: feathers the edges. Boundary pixels become partly transparent and lose the background's tint, so anti-aliased sprites don't keep a coloured halo.
- enclosed: also clears background-coloured pockets a sprite surrounds, such as the hole in a ring. Pockets smaller than the ≥ px size stay, so eyes and highlights survive.
- Pick the colour yourself: click the sheet to choose the background colour, Shift-click to add another, Alt-click to go back to automatic.
Apply (Enter) commits it; Cancel (Esc) leaves the sheet as it was.
Palette
- Recolor: pick a from and a to colour and a tolerance, then Replace color on the whole sheet. The arrows button swaps the two.
- Reduce: cut the whole sheet down to a set number of colours, for a tighter palette or a retro look.
Both work on the whole sheet and can be undone.
Props
Creating props
- Drag on an empty part of the sheet.
- Auto-detect finds props for you. See Auto-detect.
- New tile (under Sheet tools) adds a one-tile prop in the middle of the view and opens it in the pixel editor, for drawing a tile from scratch.
- Duplicate (⌘/Ctrl D) copies the selected prop, with all its data, one tile down and to the right.
- Split turns one prop into a grid of smaller ones (below).
Slicing a sheet or splitting a prop
Use Slice sheet above the canvas to divide the whole image into a grid. Set Columns and Rows, check the preview, then press Create N props. This includes empty cells and keeps existing props. In image cutting, this action is called Split image and creates pieces. For only non-empty cells or individual sprites, use Auto-detect.
Select a prop and press Split prop near the top of the inspector. Set Columns and Rows, then check the grid preview and prop count before applying. The defaults follow the prop's size in tiles. The prop is replaced by that many props covering exactly the same area, with no gaps or overlaps, even when its size doesn't divide evenly.
Props
Selecting and editing
- Select a prop by clicking it on the sheet or in the Props list. Esc deselects.
- Move it by dragging its body; resize it with any of its eight handles.
- Nudge with the arrow keys: one pixel at a time, or a whole tile with Shift.
- Type exact values in X, Y, W and H (pixels). The line below them gives its tile position and size in tiles.
- Delete with Delete, Backspace or the Delete button. Clear all, at the bottom of the Props list, removes every prop on the sheet after asking.
Working on many props at once
Shift-click props to add or remove them from the selection, hold ⌘/Ctrl and drag a box around several, or press ⌘/Ctrl A for all. Dragging or nudging moves them together, and the right panel becomes a batch editor:
| Field | Effect on every selected prop |
|---|---|
| Category | Sets the same category. |
| Add tag | Adds a tag, keeping the ones they have. |
| Rename | Names them from a pattern; each run of # becomes a number padded to that many digits. tree_## gives tree_01, tree_02… |
| Solid | Turns the solid flag on or off. |
| Delete all | Deletes them. |
Props
Names, categories and tags
- Name identifies the prop in every export and becomes its file name. Keep names unique; the sprite atlas numbers duplicates so nothing is overwritten.
- Category groups props, such as building, nature or enemy. Each category gets its own colour on the sheet and in the list, and the field suggests categories you've already used.
- Tags are free labels, as many as you like. Type one and press Enter; click its × to remove it.
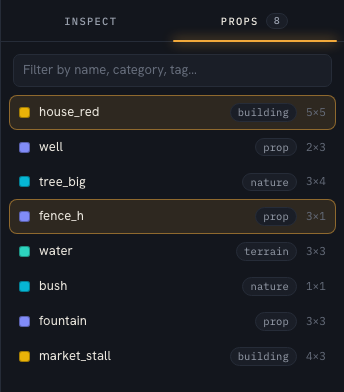
The Props tab lists every prop on the sheet with its colour, category and size in tiles. The filter box matches names, categories and tags, and props that don't match fade on the sheet, so you can find everything tagged shop at a glance.
Props
Auto-detect
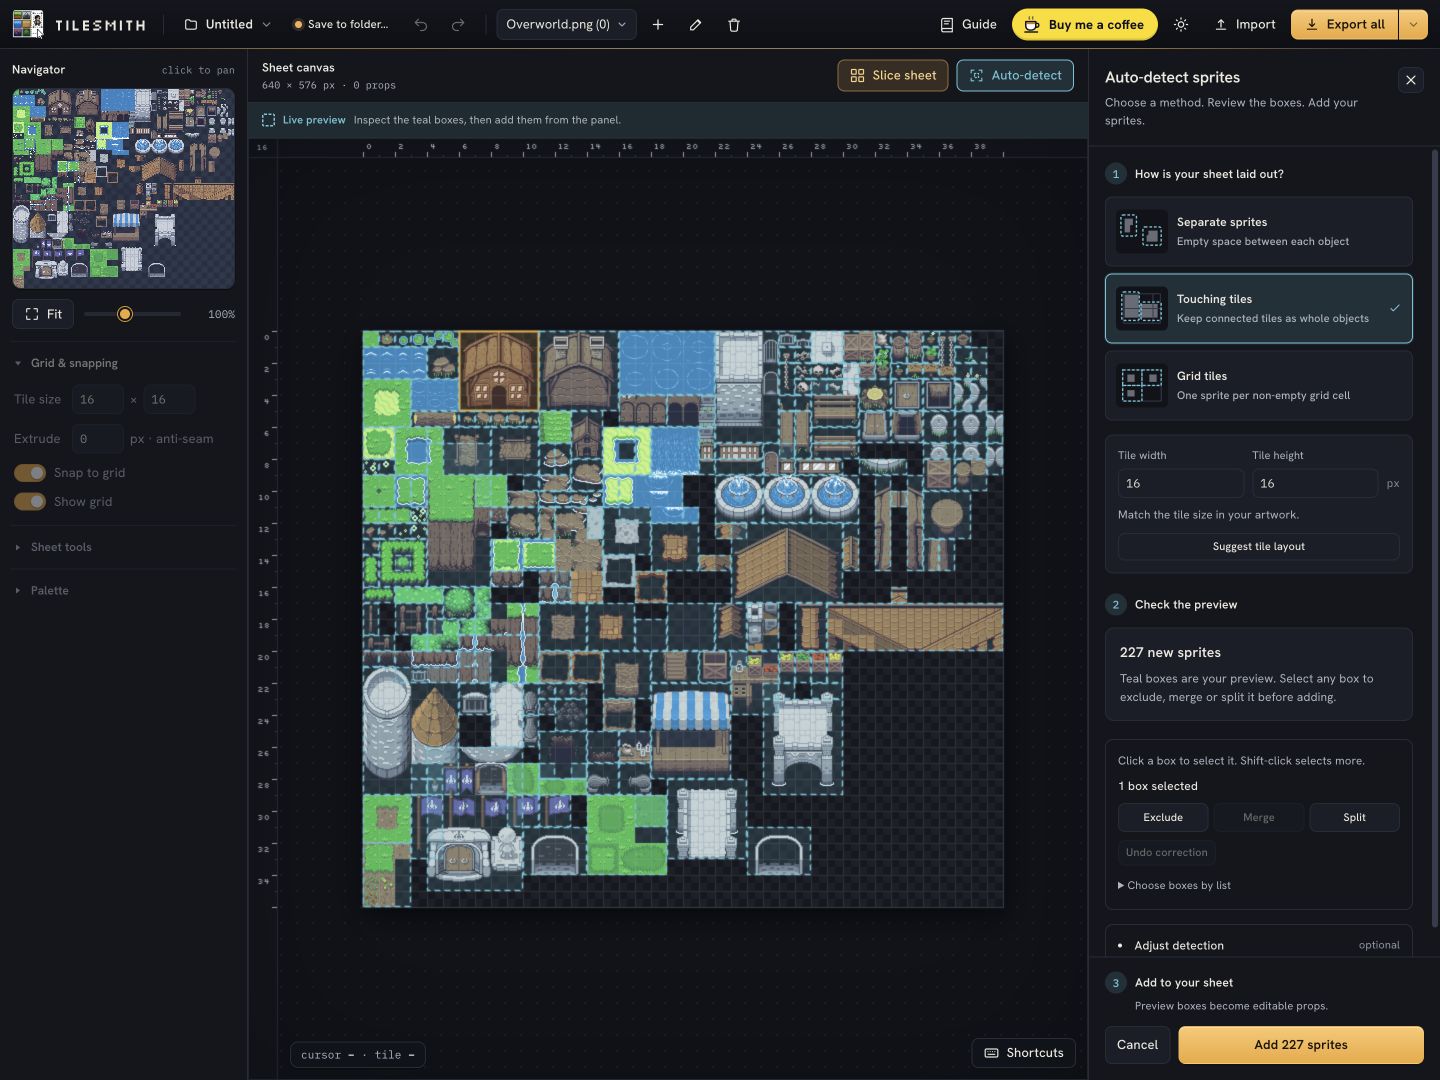
Press Auto-detect above the canvas to open the guided panel. Choose a method and inspect the teal preview boxes, then press Add N sprites. Settings refresh the preview automatically. Cancel discards it without changing your props. Boxes that an existing prop already covers are skipped, so you can map the tricky props by hand first and detect the rest. New props are named tile_1, tile_2 and so on.
Suggest a layout. Grid methods offer Suggest tile layout. A proposal shows tile size, offset and spacing, with an indication of how clearly the pattern repeats. Press its Use button to preview it; nothing is added yet. If no repeated layout is clear, enter the values manually. Partial cells along the right and bottom edges are included and clipped to the image.
Correct the preview. Click a box, or Shift-click several. Selected boxes turn amber. Exclude removes them from the preview; Merge replaces several with their combined rectangle; Split divides one box into a grid with its own preview. Undo correction or ⌘/Ctrl Z restores a preview edit. The optional Choose boxes by list control supports keyboard selection. Changing detection settings replaces these corrections. Add commits the corrected boxes in one project Undo step.
| Setting | What it does |
|---|---|
| Method | Separate sprites finds separate shapes by the empty space around them. Touching tiles is for packed sheets where tiles touch: it groups the tiles that make up each object (see below). Grid tiles keeps every tile-sized cell with something in it. |
| Offsets / spacing | Touching tiles and Grid tiles: offset X, offset Y and spacing, in pixels, for sheets with a margin or gaps between cells. |
| Background | Auto / transparency prefers meaningful transparency anywhere in the image, including sheets with sprites touching the border. On opaque sheets it uses a dominant border colour when one is clear. Transparency only counts only transparent pixels. |
| Tolerance | How close to the background a colour must be to count as empty. |
| Min. pixels | The minimum number of visible pixels in a component or grid cell. Thin sprites survive when they have enough artwork, even if they are only one pixel wide. Touching tiles counts translucent artwork too. |
| Group small detached parts | Separate sprites only: joins nearby small, aligned parts such as a shadow to a larger body when one neighbour is clearly closest. Similar-sized frames stay separate. Disable it for sheets whose small pieces should remain individual sprites. |
| Join diagonal pixels | Separate sprites only: keeps diagonal pixel-art strokes connected. Disable it when two sprites touch only at a corner. |
| Merge gap | Separate sprites only: joins shapes closer together than this many pixels, such as a sword and its glint, or a character and its shadow. |
| Expand boxes to the tile grid | Separate sprites only: grows each box out to whole tiles. |
Touching tiles, for packed tilesets
On most tilesets the tiles touch, so there's no empty space between objects for Separate sprites to find, and it returns one box over most of the sheet. Touching tiles looks at the edge between every pair of neighbouring tiles instead. Where the artwork carries on across the edge, the two tiles belong to the same object. Where two outlines meet, an object's outline runs along the edge, or the colour jumps (grass beside water), one object ends and the next begins.
It gets whole houses, fountains, bridges and terrain blocks right on a typical sheet, but it's a starting point: an object can still come out in two pieces, or two things that belong apart can stay together. Fix those with Split, or by resizing a box. Set the tile size first, since it works tile by tile.
Either the sheet's tiles touch (try Touching tiles; the app suggests it when this happens), or the background isn't being recognised as empty: use Remove background first, raise Tolerance, or switch Background to match your sheet.
Props
Game data
Open Game data in the right panel to give a prop the details your engine needs. They show on the sheet while the section is open.
| Field | What it's for |
|---|---|
| Pivot X, Y | The prop's anchor point, from 0 to 1 across its width and height. The default, 0.5 and 1, is the bottom centre: where a character's feet meet the ground. Center and Bottom set the usual two, or drag the dot on the sheet. |
| Solid | Marks the prop as blocking movement. A solid prop without a collision box gets a collision shape covering the whole prop in the Tiled and Godot exports. |
| Collision box | A hit box in pixels, measured from the prop's top-left corner and drawn dashed on the sheet. Fit to prop covers the whole prop; Fit to pixels shrink-wraps it to the visible pixels. |
| 9-slice border | Left, top, right and bottom borders that stay fixed while a UI panel or button stretches. Guides show on the sheet. |
Props
Custom metadata
For anything Tilesmith doesn't have a field for, open Custom metadata and press Add field, then give it a key and a value: hp = 10, loot = chest_small, sound = door_creak.
Every export carries these fields: custom properties in Tiled, a custom data layer per key in Godot, and the prop's data in Unity, the sprite atlas and props JSON.
Motion and terrain
Animation
Turn on the switch in the Animation section. The prop's rectangle becomes frame 1, and the other frames step on from it across the sheet.
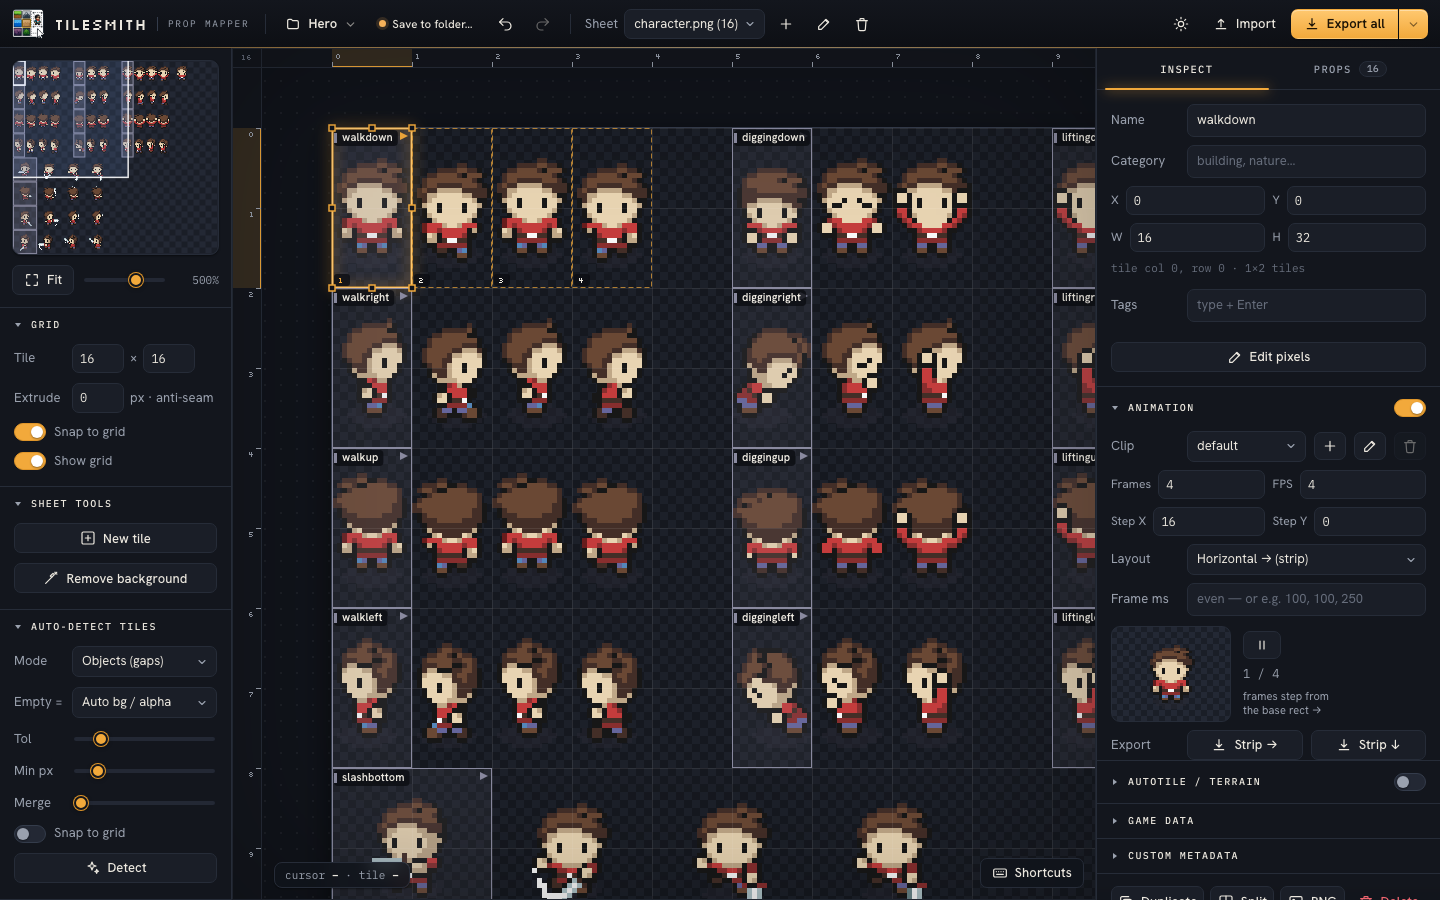
| Setting | What it does |
|---|---|
| Frames, FPS | How many frames and how fast they play. |
| Step X, Step Y | How far each frame is from the one before, in pixels. By default frames sit side by side. |
| Layout | Horizontal or Vertical strips, or Grid, which wraps onto a new row after Columns frames. Clips imported from Aseprite or an atlas show Custom frames and keep each frame's exact position. |
| Frame ms | Each frame's duration in milliseconds, comma-separated, such as 100, 100, 250. Leave it empty for even timing at the FPS. |
Clips. A prop can hold several named animations: idle, walk, attack. Pick one from Clip, or use the buttons beside it to add, rename or delete clips.
Preview. The preview loops the current clip; the button pauses it. On the sheet, the other frames are outlined and numbered, and the one playing is highlighted.
Strips. Strip → and Strip ↓ download the clip's frames as one PNG, in a row or a column.
Animations reach every export: tile animations in Tiled and Godot (plus a SpriteFrames resource per animated prop), one .anim clip each in Unity, and an animations list in the sprite atlas.
Motion and terrain
Autotile and terrain
Autotiling lets a map editor pick the right edge and corner tile as you paint. Tilesmith's job is to record which tile plays which part. Make a prop that covers the whole block of terrain tiles, then turn on Autotile / terrain.
Terrain and what it sits on
Give the block a Terrain name, such as grass, and what it sits On top of, such as dirt. Leave On top of empty for a terrain whose edge fades to transparency. Blocks that share terrain names connect, so grass on dirt and water on dirt paint together with proper transitions.
Templates
- Box · 9-slice fills in the roles of a standard 3 × 3 block for you.
- Custom leaves every role to you: click a cell in the role grid to cycle its role, right-click to go back.
- Blob · 47 picks each tile by all eight of its neighbours. Use it for one-tile-wide paths, lone tiles and T-junctions, which corner-based sets can't draw. Select a tile in the block and mark which neighbours it connects to.
The roles
Each role says which corners of the tile are the terrain grass and which are what it sits on dirt. The standard block:
Row by row, those tiles are NW N NE, W C E and SW S SE. A full set also has the pieces for concave shapes and crossings:
Role labels in the app match these: C centre, N E S W edges, NW NE SW SE outer corners, iNW… inner corners, ╲ ╱ diagonals and B for base only.
Live paint preview
Test the set before you export it. Pick a terrain brush, then left-drag to paint it and right-drag to paint what it sits on. Every autotile block on the sheet takes part, so transitions between terrains show up as they will in your game. A red cell means the set has no tile for that combination of corners: a piece is missing. Fill block paints a solid area, Clear wipes the preview, and Zoom sizes it.
Corner-based terrain needs painted areas at least two tiles wide. For single tiles and one-tile-wide paths, use Blob · 47.
Tiled gets these as terrain sets (wangsets), and Godot as terrain sets. In Godot 4.7 we checked that Godot's own terrain painter picks the same tiles as Tilesmith's preview.
Pixels
Pixel editor
Select a prop and press Edit pixels, or use New tile to start from a blank one. The editor opens the prop's pixels in a large window; drag its title bar to move it. Nothing reaches the sheet until you press Apply (Enter). Cancel (Esc) asks first if you've changed anything. An applied edit is one undo step on the sheet.
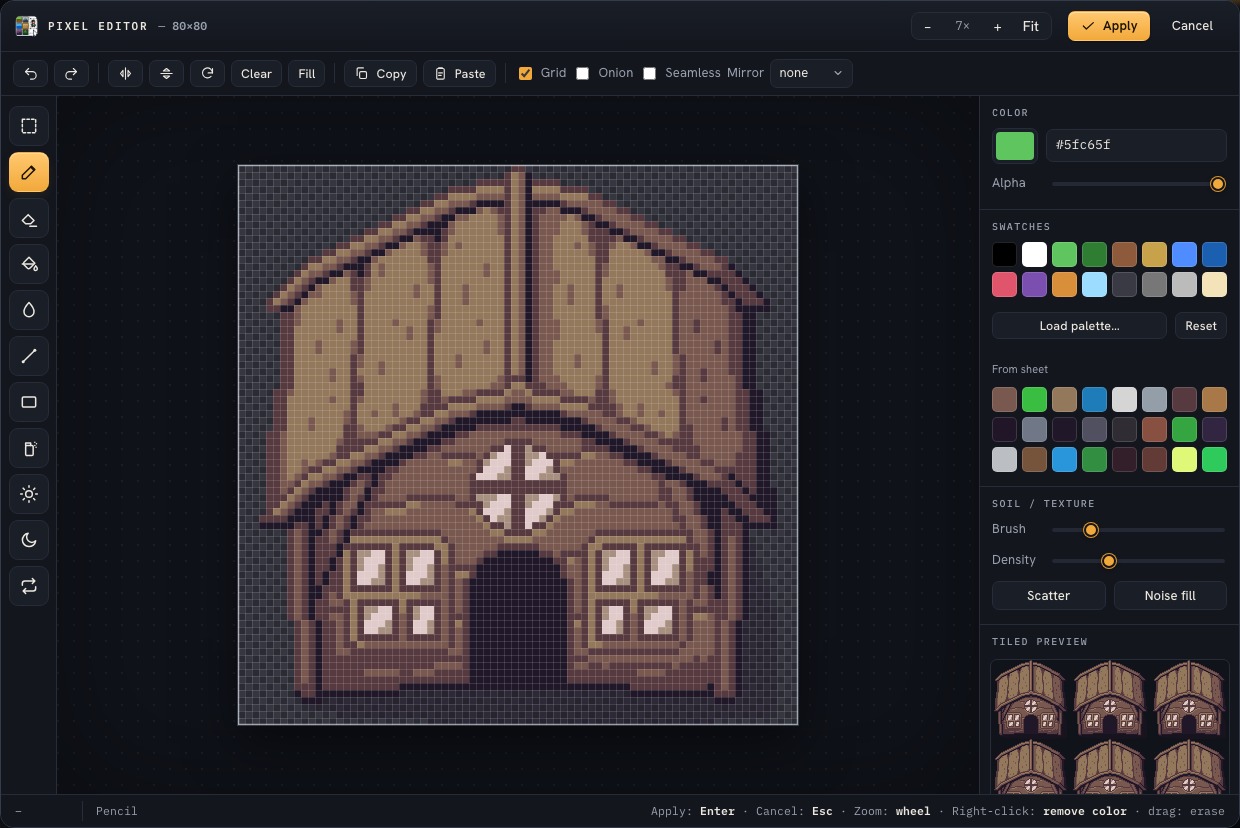
Tools
| Tool | Key | What it does |
|---|---|---|
| Select | M | Drag to select a region, drag inside it to move the pixels, Delete clears it. Switching tools drops the selection. |
| Pencil | B | Draws single pixels. |
| Eraser | E | Makes pixels transparent. Right-clicking with any drawing tool erases too. |
| Bucket fill | G | Fills an area of one colour. |
| Eyedropper | I | Picks up a colour. |
| Line, Rectangle | L R | Straight lines and rectangles. |
| Spray | S | Airbrush, using Brush and Density. |
| Lighten, Darken | Dodge and burn: brighten or shade the pixels you paint over. | |
| Replace | Replaces every pixel of the colour you click with the current colour. |
Options
- Flip horizontally or vertically, and rotate 90° (square regions only).
- Clear empties the region; Fill floods it with the current colour.
- Copy and Paste, or ⌘/Ctrl C, X, V, respect the selection.
- Onion shows the sheet pixels around the region, faded, so edges line up with the neighbouring tiles.
- Seamless wraps strokes around the edges, for textures that tile.
- Mirror repeats every stroke left-right, top-bottom or four ways.
Colour and texture
- Colour: the picker or a hex code, plus Alpha for transparency.
- Swatches: a built-in palette, or Load palette… from a Lospec
.hex, GIMP or Aseprite.gpl, JASC.palor paint.net.txtfile. Reset goes back. From sheet lists the colours your sheet already uses. - Soil / texture: Scatter sprinkles the current colour over the region; Noise fill lays down a textured base built from it. Brush and Density control both, and the spray tool.
- Tiled preview repeats the region 3 × 3, so seams show up while you draw.
Zoom with the mouse wheel, + and −, or Fit. Hold Space and drag to pan.
Export and import
Exporting
Every format lives in the menu beside the download/export button. Choosing one runs it and makes it the button's default, so one click, or ⌘/Ctrl E, repeats your usual format. Each workflow remembers its own choice. Image cutting starts with Download pieces; sprite editing starts with Everything.
Exports are named after the sheet, so forest.png gives forest.tsj, forest.tres and so on.
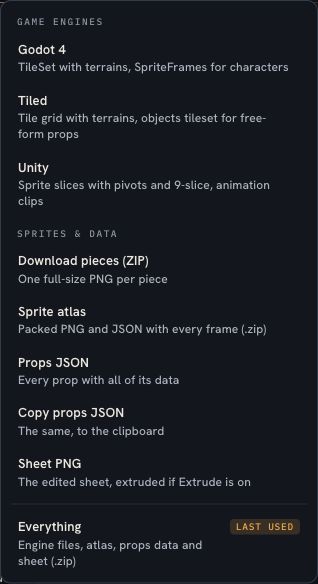
| Menu item | You get | What it carries |
|---|---|---|
| Download pieces | .pieces.zip | One PNG per cut at its full size, with transparent edges preserved. Names become file names; duplicates are numbered. |
| Godot 4 | .tres | A TileSet with custom data layers (including your metadata), collision, animation and terrains. With sprites, a .godot.zip that adds a sprites/ folder: SpriteFrames for animated props, AtlasTextures for the rest. |
| Tiled | .tsj | The tile grid with typed properties, custom metadata, animation, collision and terrain sets. With free-form props, a .tiled.zip that adds .objects.tsj: every prop at its exact size, for object layers. |
| Unity | .png.meta | Sprite slices with pivots and 9-slice borders. With animations, a zip that adds one .anim clip per clip. |
| Sprite atlas | .sprites.zip | atlas.png (packed, empty margins trimmed), atlas.json with every frame and an animations list, and sprites/ with a PNG per prop. |
| Props JSON | .props.json | Everything about every prop: rectangles, tile positions, metadata, animation, autotile. |
| Copy props JSON | Clipboard | The same JSON, ready to paste. |
| Sheet PNG | .png | The sheet with your pixel edits, extruded if Extrude is on. |
| Everything | .export-all.zip | The engine files, sprite atlas, props JSON and sheet PNG in one download. |
Tiled, Godot and Unity tilesets are grids, so a prop only fits in one if it sits exactly on whole tiles. Props that don't, or that span several tiles, go into the extra files listed above (objects tileset, sprites), and the export tells you which ones.
Single props and strips have their own buttons: PNG under the selected prop, and Strip → / Strip ↓ in Animation.
Export and import
Using exports in your engine
Godot 4
The TileSet expects the sheet at the root of your project, as res:// plus the sheet's file name. Copy the sheet PNG there along with the .tres (and the sprites/ folder, if you have one), or point the texture somewhere else in Godot's inspector. Checked in Godot 4.7.2: exports load without errors, and animation, timing, custom data, collision and terrains read back through Godot's own API.
Tiled
Put the .tsj next to the sheet PNG and open it in Tiled, or add it to a map as an external tileset. Checked in Tiled 1.12.2: Tiled reads and re-saves the tilesets without changing anything.
Unity
Put <sheet>.png.meta next to the sheet PNG in your Assets folder, replacing the one Unity made, and the sheet is sliced into sprites with pivots and borders. Import the .anim clips alongside it. The files are valid and tested, but haven't been opened in Unity itself yet, so check them on a copy before relying on them in a big project.
Sprite atlas
atlas.json follows TexturePacker's JSON (hash) layout, which PixiJS, Phaser and most 2D engines load directly. Each frame also carries Tilesmith's own data (name, category, tags, collision, 9-slice, metadata) under spritter.
Export and import
Importing
Import in the toolbar reads props from another tool and maps them onto the sheet you have open, replacing its props. That can be undone.
- Props JSON from Tilesmith.
- Tiled tilesets (
.tsj), grid or objects, including terrain sets. A terrain set with several terrains comes in as one autotile block per pair. - Aseprite JSON: tags become clips, keeping each frame's duration and the tag's direction, ping-pong included.
- TexturePacker and PixiJS atlas JSON. An atlas packed with trimming or rotation can't map onto your sheet as it is, so Tilesmith rebuilds it as a new sheet with every frame at full size.
Whole projects come in through the project menu instead (Import project file…). Import refuses them, so importing never wipes a sheet by accident.
Projects
Projects and sheets
A project holds any number of sheets, each with its own pieces or props, tile size and pixel edits. It also remembers the chosen workflow, so reopening a saved project goes straight to your work. The project menu in the toolbar has:
| Item | What it does |
|---|---|
| New project | Starts an empty project. |
| Open project… | Lists the projects saved in this browser. |
| Rename project | Renames the open project. |
| Save now | Saves immediately. Tilesmith also saves on its own a moment after every change. |
| Save to folder… | Keeps the project in a folder on your disk as you work. See Where your work is saved. |
| Open folder… | Opens a project saved in a folder, on this computer or another one. |
| Export project file… | Downloads the whole project, images included, as one .tilesproj.json. |
| Import project file… | Opens a project file. Importing a project you already have restores it to that copy, which makes project files handy backups. |
| Delete project | Deletes it from this browser, after asking. |
Switch sheets with the picker beside Sheet; the number in brackets is how many props each has. The buttons next to it add, rename and remove sheets.
Projects
Where your work is saved
Tilesmith saves every change in your browser's own storage automatically. That's fine for a quick session, but clearing site data, or switching browser or profile, loses it. The chip beside the project name shows where your work is and what to do about it:
| The chip says | Meaning |
|---|---|
| Save to folder… | So far the project is only in this browser. Click to pick a folder on your disk; from then on it saves there too, as you work. |
| Download backup… | The same, in browsers that can't write to folders (such as Firefox and Safari). Click to download a project file. |
| your folder's name | Saving into that folder. Point at the chip for the time of the last save; click to stop. |
| Reconnect folder | After a browser restart, browsers ask for folder access again. Click once to allow it. |
| Folder error | The last save to the folder failed. Your work is still in the browser; click to choose the folder again. |
Saving to a folder
Available in Chrome and Edge. The folder gets a tilesmith-project.json with every prop and setting, and each sheet as a plain PNG under sheets/. Both are readable and diff cleanly, so the folder can live in your game's repository. Open folder… opens it on another machine. If the folder changed while Tilesmith was closed (after a git pull, say), the folder's copy is the one that opens.
Browser storage is convenient, not permanent. Save to a folder, or export a project file now and then.
Projects
Undo
⌘/Ctrl Z undoes and ⌘/Ctrl Shift Z (or ⌘/Ctrl Y) redoes, as do the arrows in the toolbar. Undo covers props and pixels alike: pixel-editor edits, background removal, palette changes and pasted images. History belongs to the open sheet and starts fresh when you switch sheets. On very large sheets fewer pixel steps are kept, so the browser doesn't run out of memory.
The pixel editor has its own undo while it's open.
Reference
Keyboard shortcuts
On Windows and Linux, use Ctrl where Mac uses ⌘. The Shortcuts button in the app lists the main ones.
On the sheet
| Action | Keys |
|---|---|
| Pan | Middle-drag, or Space + drag |
| Zoom | Mouse wheel |
| Fit the sheet | F |
| Show or hide the grid | G |
| Hide or show both panels (Focus mode) | H; Esc also exits Focus mode |
| New prop | Drag on an empty area |
| Add to or remove from selection | Shift + click |
| Box select | ⌘/Ctrl + drag |
| Select all | ⌘/Ctrl A |
| Nudge 1 pixel / 1 tile | Arrows / Shift + arrows |
| Duplicate | ⌘/Ctrl D |
| Delete | Delete or Backspace |
| Close a menu, then deselect | Esc |
| Undo / redo | ⌘/Ctrl Z / ⌘/Ctrl Shift Z |
| Repeat the last export | ⌘/Ctrl E |
| Paste an image | ⌘/Ctrl V |
| Place or cancel a paste, apply or cancel background removal | Enter / Esc |
In the pixel editor
| Action | Keys |
|---|---|
| Select, Pencil, Eraser, Fill | M B E G |
| Eyedropper, Line, Rectangle, Spray | I L R S |
| Erase with any tool | Right-click |
| Zoom | + / −, or the mouse wheel |
| Pan | Space + drag |
| Copy, cut, paste | ⌘/Ctrl C X V |
| Clear the selection | Delete |
| Undo / redo | ⌘/Ctrl Z / ⌘/Ctrl Shift Z |
| Apply | Enter |
| Deselect, then close | Esc |
Reference
Privacy and offline use
Tilesmith runs entirely in your browser. Your images are opened, cut, edited and exported on your own computer; they're never uploaded, and there's no account, no ads and no tracking. Projects are stored in your browser, or in a folder you choose. The only thing Tilesmith fetches from the internet is its fonts, from Google Fonts.
You can also run it from a copy on your own machine. Exports need the page to be served over http:// rather than opened as a file, because browsers won't let a page read back pixels it loaded from disk. From the project folder, run:
python3 .claude/serve.py
then open http://localhost:8765/index.html.
Reference
Troubleshooting
“Tilesmith needs a bit more room”
The window is narrower than 880 pixels, which doesn't leave room for the sheet between the two panels. Widen the window or use a bigger screen.
Thin lines between tiles in my game
Set Extrude to 1 or 2 and export again.
Auto-detect finds one huge box
If the sheet's tiles touch each other, choose Touching tiles. Otherwise it can't tell the background from the art: remove the background first, raise Tolerance, or change Background. See Auto-detect.
A prop is missing from my Tiled or Godot tileset
It doesn't sit exactly on whole tiles, so it can't be a tile. It's in the objects tileset (Tiled) or the sprites/ folder (Godot), and the export named it. Turn on Snap to grid and adjust the prop if it should be a tile.
There's no Save to folder
Only Chrome and Edge let web pages write to a folder. In other browsers the chip offers Download backup…; export a project file regularly instead.
My projects are gone
Browser storage is cleared along with a site's data, and it's separate for each browser and profile. If you saved to a folder, use Open folder…; if you exported a project file, use Import project file….
Exports fail when I open index.html from disk
Serve the folder over http:// as described in Privacy and offline use.